DIY Yarn Wrapped Bottles
Remember all those Rustic Wedding Decor Ideas from Mayhar Designs? Well ... Ashleigh is back with another diy from that same rustic inspired wedding reception. If you missed her first project click here to learn how to add color, dimension, height and interest to your table by covering books.
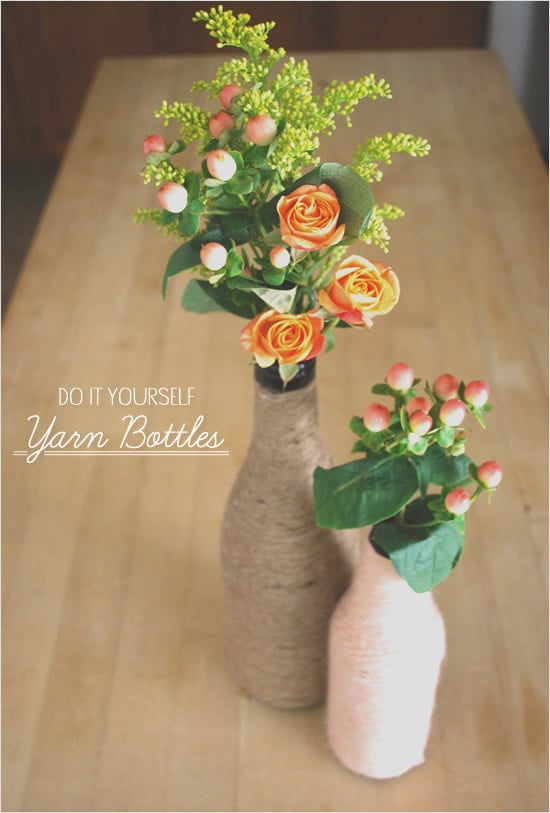
Those beautifully covered books also make the perfect stand for your floral arrangements. You can go with any type of vase, but we love the idea of using a yarn wrapped bottle. Not only are they cost effective, but it also adds a heartwarming and colorful rustic touch to your table decor. Read on to learn how to diy yarn wrapped bottles.

Read on for step by step instructions from Mayhar Designs on how to DIY Yarn Wrapped Bottles.
1. Starting at the top of your bottle, apply a tiny dab of hot glue, just under the edge. Press your yarn into the glue horizontally, leaving a tail-end. Point the tail-end downward and start wrapping…as you wrap you will hide the end! You will want each layer of yarn to rest closely to the next, without any room in between. Try playing with different tensions to see what works best.
2. When you get to the curve, you may need to ease up slightly on the tension, or apply small dabs of glue to the bottle to hold the yarn in place, depending on the angle that the bottle curves outward.
3. Continue down the bottle until you reach the bottom. Apply another small dab of glue along the base, and once the yarn is set, snip the end.
4. This method will create a clean and smooth look. For a less symmetric, more organic look, let your yarn overlap and bunch up in various directions.
5. These bottles will look great in various shades, adding color to your kitchen table or bookshelves, OR you can quickly turn them into your own custom flower vase!
6. The opening to your bottle will likely be small, so you can create your own arrangement with just a few stems. I love to use a couple of stems that act as filler and then select one or two beautiful flowers to add a pop of color.
7. For the arrangement pictured, we used an assortment of yellow solidago and peach hypericum berries as filler. They create the height and dimension for your arrangement. Trim your stems so that the blooms sprout right above the opening of the bottle and are staggered at different heights.
8. Now is the fun part! Because the bottles are so slender, one or several beautiful blooms will be a perfect compliment. We used an assortment of coral roses, but any type of round blossom with full petals will work wonderfully.
9. At the end of the day, you will want to select stems that stand tall, so they compliment the tall shape of the bottle, but experiment with different styles and textures to find your perfect creation!